Challenge Problem
Preamble
The challenge problem described below was used for the MDETools Workshop in 2018 (original CfP can be found here). Descriptions of the six accepted submissions can be found in the MODELS’18 Companion Proceedings published with CEUR.
Due to the success of the challenge, the solication of submissions is kept open, although the workshop is now over. In other words, submissions are still accepted and will be made publicly available together with the submissions presented at MDETools’18 on these pages.
To allow a broad comparison, any language and supporting development tool can be used to solve the challenge, including general-purpose programming languages (such as Python or Java) and modeling languages (such as StateFlow/Simulink, UML, LabView, etc).
Submission instructions
Once you are done with the challenge described below. please send the following to dingel@cs.queensu.ca:
-
Description of model in format readable by the tool: I.e., the file(s) that your MDE tool creates when you export or save the model. Any user of the tool should be able to import (load) this file (these files) and thus be able to inspect the model and use it to solve the challenge.
-
Installation instructions: Please send links to pages describing how to obtain, install, and use your tool.
-
Description of model in format readable by human: I.e., a description of the model in a format that allows the model to be read by humans without the use of the tool.
For some tools, the human-readable description might be the same as the tool-readable description (e.g., for models expressed a textual notation or DSL). Some other tools (e.g., tools that persist the model in XMI), however, may not persist the model in a human-readable format. In that case, we would like to ask you to prepare a screencast (video) describing the model.
In the screencast, you can use your tool to traverse the model and show the elements it consists of. The description should cover all user-created elements including, e.g., action code on transitions in state machine models. Narration (i.e., audio) is optional. A partial list of tools that can be used to create screencasts can be found here. Please make the screencast publicly available (by, e.g., uploading it to YouTube) and send us the link.
Overview of challenge problem
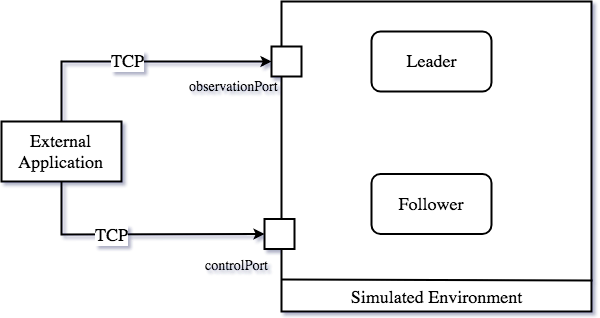
We have created a simulated environment that contains two rovers called leader and follower. Upon starting the simulation, leader takes a random path while changing its speed continuously. The goal of the challenge problem is to use an MDD tool and design a model for follower such that (the code generated from) the model causes the follower to follow leader while always staying at a safe distance from it. Any tool that can generate code from models in some modeling language can be used. The generated code can be in any language, as long as it supports TCP socket communication.
To control the follower two set of commands are provided:
-
A set of control commands that can be used to control the
followersuch asspeedupandturn. -
A set of observation commands that allows obtaining relevant information such as the position of the the
leader.
As illustrated in the following figure, control and observation commands are issued by sending the corresponding message using TCP connections to the controlPort or the observationPort. The numbers of these ports can be configured (see below). During execution, any situtation in which the follower is not within a safe distance is considered unsafe and must be avoided. The safe distance is defined as the range between the configuration parameters maxDistance and minDistance can be configured (see below).
Starting Guide
The only prerequisite for using simulator is Java 1.7.0_80 or higher. Please make sure that Java is installed before start using the simulation.
Download
The simulation package is avaialble for three platforms (Mac, Windows, Linux). To download please use the following links:
Running the simulation
The simulation package is a compressed zip file which contains the following folders and files. Note that depending on your platfrom, only one of the three folders Linux, Mac, and Windows is included.
.
├── Linux
│   ├── Challenge-Linux.x86             ---> Executable simulator for Linux x86
│   ├── Challenge-Linux.x86_64          ---> Executable simulator for Linux x86_64
│   └── Challenge-Linux_Data
├── Mac
│   └── Challenge-Mac.app               ---> Executable simulator for Mac
├── RoverController-Source              ---> The source code of a simple java program that controls the follower using the keyboard
│   ├── DriveCommands.java
│   ├── RoverController.java
│   └── SocketCommunicator.java
├── RoverController.jar                 ---> A simple java program that controls the follower using the keyboard
├── Settings
│   └── config.txt                      ---> Configuration file
├── UnityObserver.jar                   ---> A program that provides observation service and commands
└── Windows
    ├── Challenge-Win64.exe             ---> Executable simulator for Windows 64
    ├── Challenge-Win64_Data
    └── UnityPlayer.dll
To run the simulation follow the steps below:
-
Run the executable simulator. Depending on the platform used, the simulator executable is located in one of the folders
Linux|Windows|Mac. This will load a simulation environment as shown in the following figure. As discussed, it includes two roversleaderandfollower. When the simulation is loaded, the control commands are ready to use. By default, the controlPort has number 9998. However, to be able to use the observation commands, you need to start the UnityObserver.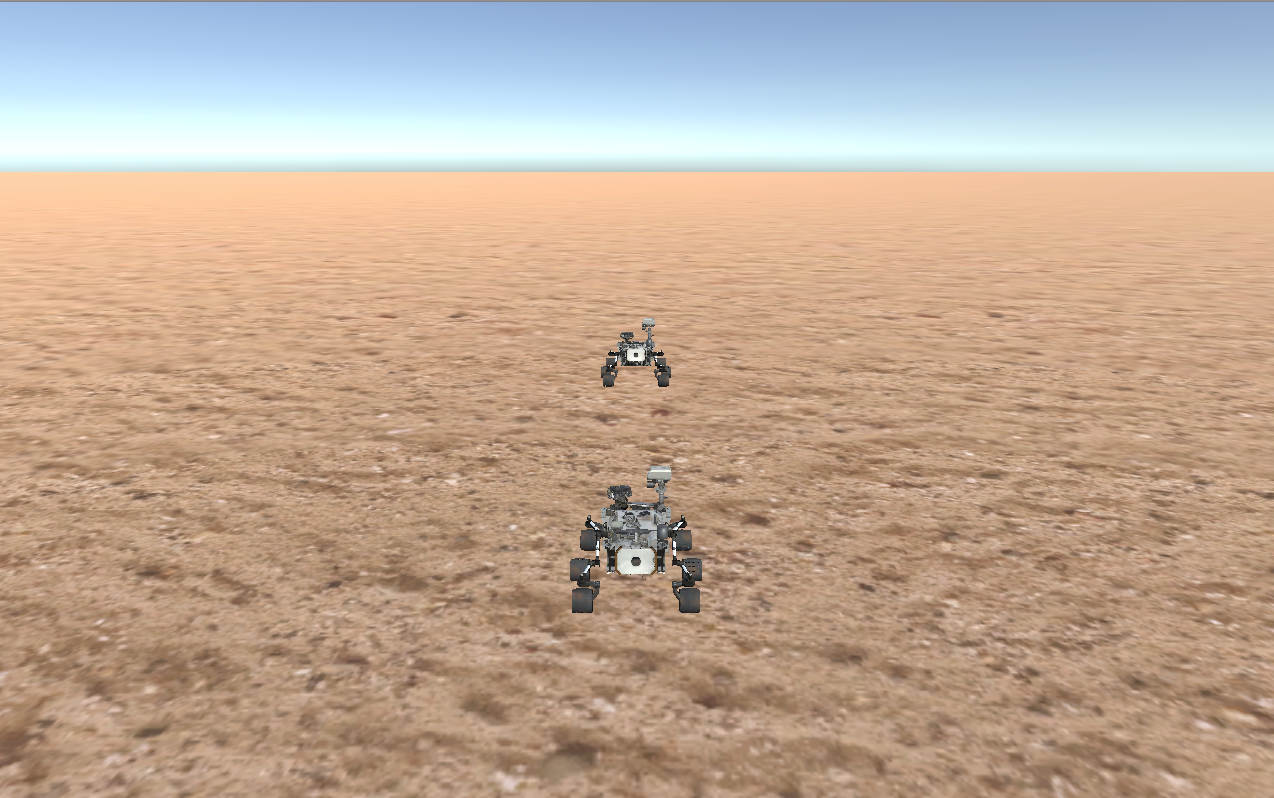
-
To start the observer, run the
UnityObserver.jar. Now, observation commands are available. By default, the observationPort has number 9999. If you’re running macOS and this step gives you trouble, the discussion in issue 3 may be helpful. -
Now everything is ready to use, and you can start modeling your control. First, you need to send a
readycommand to start the simulation. To make sure that the simulation and the UnityObserver have started correctly, you can use the simple Java program (RoverController.jar) that allows controlling thefollowerusing the arrow keys on your keyboard. The “R” key can also be pressed in theRoverController.jarprogram to send thereadymessage to UnityObserver to begin the movement of theleader. The source code of this program is available inRoverController-Sourceand might be helpful to become more familiar with the available commands. -
If you encounter problems during any of these steps, please check the issue tracker for more information. If you cannot find an answer, open a new issue.
Configuration
The simulation can be configured using the parameters inside the Settings/config.txt. You may need to change this configuration in special cases such as changing TCP ports. The main configuration and their default value are described below.
| Parameter | Default Value | Description | Hints |
|---|---|---|---|
| controlPort | 9998 | TCP port for control commands | None |
| observationPort | 9999 | TCP port for observation commands | None |
| leaderPort | 9997 | TCP port that the UnityObserver controls the leader through | Changing this configuration is not recommended |
| evaluationPort | 9996 | TCP port that the UnityObserver observes the follower through | Changing this configuration is not recommended |
| simulationIP | 127.0.0.1 | IP address that the simulation and the UnityObserver are running on | None |
| runTime | 60000 | Total execution time of the simulation in ms | None |
| waitMin | 2000 | Minimum time between direction changes for the leader in ms | None |
| waitMax | 5000 | Maximum time between direction changes for the leader in ms | None |
| speedMin | 10 | Minimum wheel motor speed for the leader in % of total | None |
| speedMax | 60 | Maximum wheel motor speed for the leader in % of total | None |
| straightPercent | 20 | Percent chance that the rover will go straight instead of turning | None |
| fileName | test1.csv | Name of the file to read or write movements info | None |
| preRecorded | false | false will create a new set of random moves and write them to file fileName after simulation. true will read moves from the file and play them back. |
None |
| minDistance | 12 | Distance at which the follower is too close to the leader | None |
| maxDistance | 15 | Distance at which the follower is too far from the leader | None |
| sampleRate | 250 | Time in ms between position updates and distance evaluations | None |
Supported Commands
Several commands are provided for control and observation which can be invoked by sending a message to the corresponding TCP port.
For control commands, each message is an ASCII string starting with "Rover," followed by the name of the command and a parameter list. The parameters are enclosed in parentheses and separated by commas. The number of parameters ranges between zeros and two. For example, the brake command has one integer parameter indicating the strength with which the brake is to be applied, so sending the string "Rover,brake(2)" to the control port will invoke the brake command with parameter 2 and result in the brake being applied to all wheels with a power of 2%.
Two commands are available to determine the position of the leader. These commands take no parameters and are also sent in a string. For instance, sending the message "Leader,GPS()" to the observation port will result in a return message "Leader,<posx>,<posz>;", i.e., a string "Leader," followed by a string containing two Real numbers (type double) representing the x and z coordinates of the leader (since rovers are driving on a flat plane, the y coordinate is always zero and thus omitted). The command ready starts the simulation.
Below we describe the supported commands.
Control Commands
| Message Format | Return Message | Description |
|---|---|---|
| “Rover,setForwardPower(<Int>)” | None | Set the power applied to all wheels as a percentage of max power (-100 to 100) |
| “Rover,incrementPower(<Int>)” | None | Increment the power applied to all wheels as a percentage of max power (-100 to 100) |
| “Rover,setLRPower(<Int>,<Int>)” | None | Set the power of the left and right wheels as percentages of max power (-100 to 100). First |
| “Rover,brake(<Int>)” | None | Apply the amount of brake power to all wheels as a percentage of max brake force (0-100) |
| “Rover,GPS()” | “Rover,<posx>,<posz>;” | Returns the x and z coordinates of the follower as a Real number |
| “Rover,getCompass()” | “Rover,<Real>;” | Returns the degrees clockwise from North as a Real number |
Observation Commands
| Message Format | Return Message | Description |
|---|---|---|
| “Leader,GPS()” | “Leader,<posx>,<posz>;” | Returns the x and z coordinates of the leader as Real numbers |
| “Leader,Distance()” | “Leader,<dist>;” | Returns the distance between follower and leader as a Real number |
| “ready” | “Simulation Started!” | Indicates your program is ready, and begins the simulation |
How to evaluate your solution?
As mentioned, the follower should always keep a safe distance from the leader. To enforce this rule, the UnityObserver always monitors the distance between the two rovers and reports the amount of time that the follower violates it, i.e., is out of the safe distance. You can evaluate your solution based on this data reported by the UnityObserver.
Note that by setting straightPercent to 0, leader will take a straight path, hence following it would be an easy problem to solve. We expect your solution work with different values for straightPercent.
How to ask for additional help?
Users encountering technical difficulties during the use of the simulator can open a new issue at https://github.com/mdetools/mdetools18/issues.